Introduction
Feeling like my computer needed some modifications I decided it was time to add some lighting to it. With that big window in the side of it, adding some lights to show off the hardware inside just made sense. In the past I had used a cold cathode tube to light my case which worked well but was limited to a single color. Today, multi-color or RGB LEDs are common for case lighting and these would be my light source of choice. With them I could light my case with any color I’d like and be able to change it on the fly. Definitely cool stuff!
When I built my new computer last fall I installed a Corsair h100i water cooler to keep the CPU cool. One of the features of this cooler is Corsair’s CorsairLink which allows you to monitor the temperature of the water cooler, set the fan speed either based on the temperature or at a fixed speed and even change the color of the little LED that illuminates the Corsair logo on the pump block (color also can be based on temp or fixed) all from an application installed on your PC. CorsairLink is not limited to just owners of the h100i however. Corsair sells a module they call the CorsairLink Commander which allows you to control up to 8 channels of CorsairLink accessories like fan controllers, temp sensors and even LED case lighting. For my computer it was the LED lighting accessory, the CorsairLink Lighting Node, that I was most interested in.
When I first looked into the CorsairLink Lighting Node it seemed like I might need to buy a CorsairLink Commander to use it. While the lighting node is only $30, the commander runs about $55. With no plans to use it to control fans (I use the Asus AI Suite software along with the fan headers on the motherboard) the Commander seemed like a lot of extra money to spend just to use the lighting node. I thought to myself, “maybe I can use the h100i to control it? It does seem to have a port that isn’t being used that looks just like the ones on the Commander.” Of course Corsair’s website was no help in determining if the h100i could be used to control the lighting node but, the users of the forums seemed to be indicating that it could. With fair confidence that it would work I went ahead and ordered it and guess what? It works!
Unpacking the Corsair Link Lighting Node
The CorsairLink Lighting Node comes in OEM packaging, simply a small p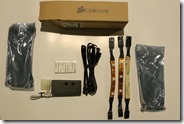 lain brown box with the Corsair logo and a sticker to identify the part. In side the box you will find the following:
- 1x CorsairLink Lighting Node
- 1x CorsairLink Digital Cable
- 3x RGB LED Strips
- 3x RGB LED Strip Extension Cables
- 1x Piece of Double Sided Sticky Tape
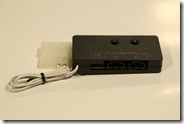 The lighting node is a small black rectangular module and is the heart of the lighting system. On it you will find a 4-pin Molex connector, a CorsairLink digital port, two RGB LED ports and a two buttons. The 4-pin Molex connector provides power to the node and connects to an unused Molex power connector from your computers Power Supply Unit. The CorsairLink digital port is used to connect the node to a commander unit so the node can be controlled from software. The two RGB LED ports provide power to the RGB LED strips and provide two channels of LED lighting control. Finally, the buttons on the node allow you to cycle the RGB LED strips attached to each channel through several different colors allowing use of the node even if no commander unit is present.
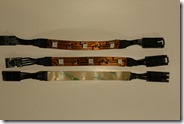 The LED strips provided have 3 RGB LEDs each and are about 3 inches long from the first LED to the third LED and are about 7.5 inches long overall with the wiring and connectors. The connectors on the ends of each strip are a 4-pin locking style connector with a plug on one end and a jack on the other allowing the strips to be chained together to create a longer strip. On the back of each strip is 3M adhesive allowing for easy mounting of the strips inside your case. Simply pull off the backing and apply the strip.
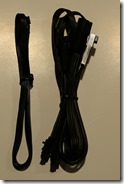 The extension cables provided are just over 13 inches long and have the same 4-pin connectors on each end as the RGB LED strips. These provide a simple, solder free, way to route the power from the lighting node to the LED strips without having to place the node directly next to the strips. They also come in handy for quickly disconnecting the LED strips from the node when taking the side panel off of your case as the LEDs are commonly mounted on the side panel while the node is located within the case.
Installation
Installation of the CorsairLink Lighting Node is very simple and requires no tools (other than any tools your case might require to open). In this section I will give you my recommended instructions for installing the lighting node and what I did specifically to install it in my case a Corsair Vengeance C70 case.
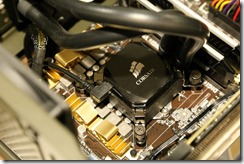 The first thing you’ll want to do is connect the CorsairLink digital cable to your commander unit, in my case the h100i. On the h100i this cable plugs into the small connector next to the mini-USB port on the water block/pump unit as can be seen in the picture right. You want to connect this cable first because the length of this cable will determine where you can mount your lighting node. If you don’t have a CorsairLink Commander or an h80i/h100i then you can put this cable back in the box and move on to mounting the lighting node.
The next thing you’ll want to do is connect the lighting node to the other end of the CorsairLink digital cable. With this connected you can now determine the best place to mount the node. To mount the node use the included piece of double sided sticky tape. Peel the backing off one side of the tape and stick it to the back of the node. Peel the backing off the other side of the tape then stick it to your case to mount the node.
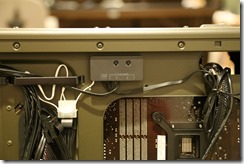 When finding the best place for the lighting node, keep in mind that wherever you place it you will also need to route a power cable with 4-pin Molex connector from your power supply. One option would be to mount it to the ceiling of the case as the digital cable should have no problem reaching from an h80i/h100i and you may already have a 4-pin Molex connector nearby from a power cable going to an optical drive. In my computer case, the ceiling of it is occupied by the radiator for the h100i so I chose to mount the lighting node on the backside of the motherboard tray. This gives the setup a cleaner look as well as I can route the digital cable and the power cable behind the motherboard tray and keep things up front tidy. Note that this location does make accessing the button on the lighting node inconvenient. Since I would be using the commander unit of the h100i to control the node this isn’t a problem but if you do not have a commander unit then you will probably want to mount the node somewhere else where it can easily be reached.
The next step in the installation is to mount the RGB LED strips. However, before mounting them you’ll want to do some experimenting to find the best positions for them. The best position by far seems to be on the side panel of the case so the LEDs are shining in onto the hardware but, with only three strips you’ll want to make sure you place them in spots on the side panel that maximize the light coverage. To find these spots, use the extension cables to connect the strips to the lighting node then turn the system on. With the LED strips lit and hanging loosely, place the side panel next to the case and move the strips to various positions around the panel until you get the best lighting on your hardware.
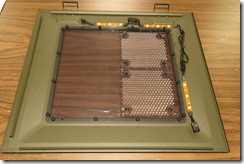 On my Vengeance C70 case I placed two of the strips above the window near the back edge and placed one strip on the back edge of the window near the bottom as can be seen in the image right. The two strips at the top of the window would provide good coverage over the CPU and RAM slots while the strip on the back edge near the bottom would light up the PCIe slots. The strips at the top were connected directly together while the strip at the bottom back edge of the window required use of one of the extension cables to connect it to the other two strips. Looking at the side panel from the inside it doesn’t look all that pretty but from the outside you can’t even see the strips or cables making it look very slick and clean!
The last step is to route the remaining extension cables from the lighting node over the the plug on the LED strips. I placed the strips so that the plug connector would be at the top near the front edge of the window. In this position I could connect the strips to the node by routing the remaining extension cables from the lighting node, through the mostly empty space in the front top portion of the case and over to the plug on the LED strip. Alternatively I could have reversed the directions of the strips and had the plug at the bottom of the case but this would lead to an extension cable draping over the power supply or the bottom of the case (plus the extensions wouldn’t reach that far because of where I mounted the lighting node). By routing the extension cable up top toward the front the cable is kept out of view and the inside remains looking clean.
CorsairLink Software
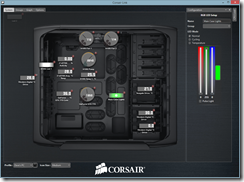 With the hardware installed and the system powered on, it’s time to load the software. Since I had the h100i installed for a while now I already had the CorsairLink software installed. I was pleased to find that when I started the software it instantly recognized the lighting node and the two LED channels showed up on the System Tab. Since I was only using channel one of the two channels I placed LED 1 on the case image on the System Tab and chose to disable LED 2.
To configure the LED channel simply click on it and the Configuration pane opens from the right. Options for configuring the LED channel are single color, fade between two or four colors or you can group the LED channel with a temperature sensor and change the color based on temperature. By grouping the LED channel with a temp sensor you can use the color for real time feedback of how hot you system is running. For cooler temps set the color to blue, medium temps green and high temps red. Usually I keep the LED channel configured for fading between four colors and set those colors for red, green, blue and white. With these four colors the LEDs seem to hit most all of the colors in between as it fades from color to color.
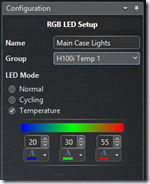
 After you have configured the LED channels simply click save to save the configuration to the selected CorsairLink profile. The LEDs will continue to operate as configured until the next time you change setting. One of the things I really like about this system is that the configuration seems to get saved to the hardware as the LEDs continue to operate as configured even after closing the software and even after rebooting the system. This is nice as you don’t have the burden and overhead of keeping a utility running on your PC to keep the lights working.
Conclusion
I have to say that I am very happy with the CorsairLink Lighting Node. This product was easy to install, easy to get up and running, well integrated with other CorsairLink products and more configurable than I expected! I’m very pleased with how well the product works and love the way my case looks after installing it! Using cold cathode tubes in the past worked well and provided a nice look but having only a single color, the look would get boring after a while. With RGB LEDs I can chose any color I want and even have them change on the fly. It’s great!
My only complaint with the product is that I wish it came with more RGB LED strips. The three strips provided with the kit light up the motherboard pretty well but the area in the front of the case is left somewhat in darkness. With the number of strips that are included you get just enough lighting to look good but nothing more. Since you will most likely use all the strips for the main lighting you will probably use all of the strips on a single channel and have nothing left to plug into channel two. Corsair claims additional strips can be purchased and even advertise that up to <54> can be connected per channel but no where on Corsair’s website or the rest of the web can these strips be found.
Fortunately the LEDs used by the lighting node kit are standard 5050 type LEDs which can be purchased in 5 meter rolls for as little as $16-20 on Amazon. With a little soldering skill these strips can be made to work with the CorsairLink Lighting Node. I have actually purchased a set of these and will post a guide on how to modify them to work with the lighting node.
Overall though I am very happy with my purchase of the CorsairLink Lighting Node. It works well and I think it made my case look great! To see more pictures of my results, click on the thumbnails below.


thanks a lot for this explanation..i was wondering whether it will work with h100i..so thanks to u for this
looking forward for the guide on how to use standard 5050 leds with this..
I really need to get around to adding this don’t I? Summer time! Don’t get on the computer much. Weather is turning though so hopefully soon.
Where’d did you purchase the lighting node from? I tried amazon and newegg for corsair link lighting node but no results.
I purchased the kit directly from Corsair. You can get it from http://www.corsair.com/en-us/corsair-link-lightning-node